Implementation
Prerequisites
Before reading this page, read the page on implementing image transcoding solutions yourself (as much of the same process is required).
This page assumes you already know the steps involved in that, and focuses on specific differences you need to account for when transcoding videos instead of images.
Video encoding libraries
I highly recommend using FFmpeg for transcoding videos. You can either compile FFmpeg yourself or use John Van Sickle's pre-built binaries here.
Compiling FFmpeg on AWS Lightsail servers
Compiling FFmpeg from scratch isn't simple in the slightest - I highly recommend you use https://github.com/zimbatm/ffmpeg-static to do it, as it removes many of the stumbling blocks you will otherwise encounter and makes the process much, much easier. Be warned: FFmpeg is an extremely complex piece of software to compile - your build may not perform as expected, even using the script above.
You can use the normal LAMP offering in Lightsail for the compilation. The Bitnami LAMP stack that Lightsail uses runs on Debian, so it's compatible with the scripts above.
You will need to use at least the $10 server tier - a $3.5 server will not suffice here. Lightsail servers use a burstable CPU system; they accrue CPU credits over time they can use to run at higher than normal capacity, but when operating above that capacity, they consume the credits. The baseline "performance" counted as capacity changes on which price of server you chose; the $3.5 server considers 5% CPU usage the baseline for instance, so doing anything heavy will eat your CPU credits like crazy (and you can't accumulate credits forever, they have a limit for each server).
When you start up a server, there's a small grace period where you get some extra credits that aren't displayed in the metrics screens, to stop smaller servers becoming sluggish when e.g. installation scripts are run on them. Compiling FFmpeg takes at least several minutes, so you're going to need a half decent server for this.
You can see in the article from Amazon here exactly how this works. Here's a screenshot of the baselines of each server type from the article:
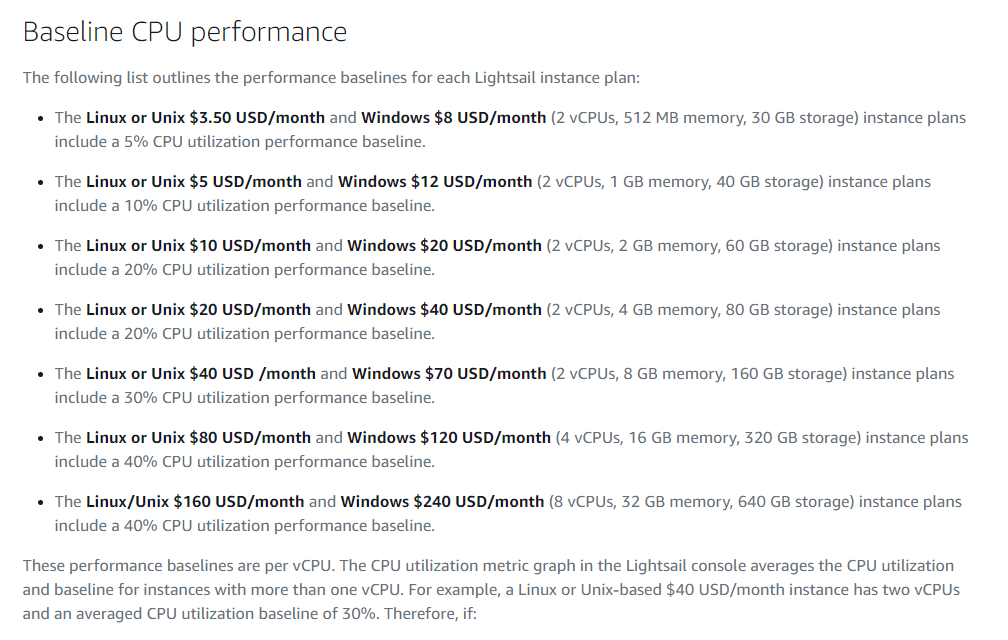
The $20/month Linux servers don't have any benefit in this case over the $10 one, and the $40 one is likely to be overkill, so I recommend using the $10 option for this purpose. You won't actually be billed much, as you don't need to keep this server around after you finish compiling and whatnot; Lightsail charges in hourly increments, so probably a few cents. If you have trouble with your server getting throttled due to a lack of CPU credits, try again from scratch with a higher price instance.
Notes on the ffmpeg-static GitHub repository
Having set up your Lightsail server, copy the files from that repository into a new folder. Make sure to change the permissions on the items within, so the scripts are executable, and then run the build-ubuntu script inside it.
chmod 755 yourfolder/
cd yourfolder
./build-ubuntu.sh
If something goes wrong, it usually happens fairly fast. Otherwise, let it run - go get some coffee or something - and when it's finished the "bin" directory inside your folder will contain the compiled executables. You only need ffmpeg for this use case, the other executables are not necessary here.
Download the ffmpeg executable you compiled, put it in a folder named "bin" on its own, and zip that folder, so you have a zip file containing a "bin" folder, and the ffmpeg executable inside that folder. You can then upload this to Lambda as a layer, for processing videos. The same instructions for uploading Lambda layers from the image resizing page applies here.
Using FFmpeg
FFmpeg isn't designed to be user friendly. It's powerful, and has an absolute ton of options which you need to understand.
Example FFmpeg commands
For simplicity, and to illustrate roughly how ffmpeg is used, here's an example command that resizes a video, sets it to a certain quality level, and re-encodes it using the x265/HEVC encoder into an mp4. The command below has been split into multiple lines using the backslash character so that it's easier to read here, but that isn't necessary in production.
/opt/bin/ffmpeg \
-y \
-loglevel debug \
-i "somevideo.mp4" \
-c:v libx265 \
-c:a copy \
-preset medium \
-crf 28 \
-filter:v scale=trunc(oh*a/2)*2:480 \
"somevideo_resized_480p.mp4"
An overview of the commands used here:
| /opt/bin/ffmpeg | Path to the ffmpeg executable. |
| -y | Overwrite existing file without confirmation. |
| -loglevel | Set FFmpeg's logging level. |
| -i | -i specifies the input. One -i per input; you need the quotes in case there's a space in the input file's path. |
| -c:v | Set the video codec. Here, libx265 = x265/HEVC. |
| -c:a | Set the audio codec. Here, copy = use the original audio without re-encoding. For both audio and video, you can't use the copy option if you are applying a filter for that stream (e.g. you cannot use filter:v and c:v copy in the same command). |
| -preset | Set the video encoder preset. Medium is the default, so you can omit this parameter if you want. Generally not a good idea to change this unless you have a very specific reason to. |
| -crf | Constant rate factor, an arbitrary quality number for x264 and x265 video codecs. More details on this in the next section. |
| -filter:v | Video filter, for transformations. More info on this command in the next section. |
| "somevideo_resized_480p.mp4" | The output filepath. No command flag is needed for this, but it is always the final parameter. |
FFmpeg video and audio filters
The filter:v and filter:a commands, along with the more unwieldy filter:complex, allow you to perform all kinds of transformations on videos. For the purposes of transcoding videos, we can use the scale function. Let's look at the filter command from the example above again.
-filter:v scale=trunc(oh*a/2)*2:480The variables here have predefined meanings: "oh" is the output height, and "a" is the aspect ratio. Effectively we're telling it to preserve the original aspect ratio of the original video, by setting the height to 480, and making the width of the video a product of the height and the aspect ratio such that it's the same as the old video's aspect ratio.
Note that the weird division by two and then multiplication by two is to avoid an awkward error, where the x264 and x265 encoders will fail if they are given a non-integer value.
Processing videos with FFmpeg in Lambda
With the FFmpeg Lambda layer in place, now we can think about the code to use it. You can take a look at this guide for a basic overview; the example code here is using Python. I found the example code didn't work too well, and so I created my own version for video transcoding; I've commented it and simplified a few bits to make it easier to understand.
import json
import os
import subprocess
import shutil
import shlex
import boto3
import sys
import logging

logger = logging.getLogger()

# These are the environment variables for your Lambda function.
# You define these in the Environment Variables area in the Lambda console.
s3_input_bucket = os.environ['S3_INPUT_BUCKET']
s3_output_bucket = os.environ['S3_OUTPUT_BUCKET']
x264_preset = os.environ['X264_PRESET']
x265_preset = os.environ['X265_PRESET']
vcodec = os.environ['VIDEO_CODEC']
acodec = os.environ['AUDIO_CODEC']
loglevel_opt_enabled = os.environ['FFMPEG_LOGLEVEL_OPT_ENABLED']
loglevel_opt_param = os.environ['FFMPEG_LOGLEVEL_OPT_PARAM']
report_opt_enabled = os.environ['FFMPEG_REPORT_OPT_ENABLED']
crf = os.environ['CRF']

def lambda_handler(event, context):
    # The event is a JSON object you sent to the Lambda function when invoking it.
    # The array key doesn't have to be "parameters", it could be whatever you want.
    s3_source_key = event['parameters']['sourceKey']
    new_size = event['parameters']['newSize']
    user_id = str(event['parameters']['userID'])
    new_height = new_size.split("x")[1]

    crf_opt = " -crf " + crf + " "

    # Assemble the name and path for the new resized video.
    s3_source_basename = os.path.splitext(os.path.basename(s3_source_key))[0]
    s3_source_ext =  os.path.splitext(os.path.basename(s3_source_key))[1]
    resized_video_filename = s3_source_basename + "_resized_" + new_height + ".mp4"

    # The S3 destination, to put the newly created video into.
    s3_destination_folder = "<your S3 folder/prefix here>"
    s3_destination_filename = s3_destination_folder + resized_video_filename

    # These are folders in the Lambda function's temporary runtime environment.
    temp_folder_path = "/tmp"
    temp_output_folder = temp_folder_path + "/" + user_id
    temp_input_folder = temp_folder_path + "/input/" + user_id
    temp_output_path = temp_output_folder + "/" + resized_video_filename
    temp_input_path = temp_input_folder + "/" + s3_source_basename + s3_source_ext

    # Lambda functions do not always reset their environment. If they are run frequently,
    # the same Lambda "thread" may still have objects from a previous invocation.
    # Concurrent Lambda threads do not share resources, so it's not a major
    # concern here, but we want to avoid the environment running out of storage.
    temp_output_folder_exists = os.path.exists(temp_output_folder)
    if temp_output_folder_exists:
        shutil.rmtree(temp_output_folder)

    temp_input_folder_exists = os.path.exists(temp_input_folder)
    if temp_input_folder_exists:
        shutil.rmtree(temp_input_folder)

    # Recreate the temp folders for FFmpeg to use.
    os.makedirs(temp_output_folder)
    os.makedirs(temp_input_folder)

    s3_client = boto3.client('s3')
    s3 = boto3.resource('s3')
    # Download the video file to process into the temp input folder.
    s3.meta.client.download_file(s3_input_bucket, s3_source_key, temp_input_path)

    # Decide the options to be passed to ffmpeg, and then build a string for the full command.
    filter_scale_opt = " -filter:v scale=trunc(oh*a/2)*2:" + new_height + " "

    if (vcodec == "x265"):
        preset_opt = " -preset " + x265_preset + " "
    else:
        preset_opt = " -preset " + x264_preset + " "
    # Set the video and audio codecs.
    codec_opts = " -c:v " + vcodec + " -c:a " + acodec
    # Note the escaped double quotes here!
    input_opt = " -i \"" + temp_input_path + "\" "
    output_opt = " \"" + temp_output_path + "\""
    overwrite_opt = " -y "
    # Decide whether to set the report and log level options.
    # You could omit this for simplicity if you wanted.
    if (report_opt_enabled == "true"):
        report_opt = " -report "
    else:
        report_opt = ""
    if (loglevel_opt_enabled == "true"):
        loglevel_opt = " -loglevel " + loglevel_opt_param + " "
    else:
        loglevel_opt = ""
    # Create the command to run ffmpeg.
    # Shlex is used to make it readable by the subprocess.run command.
    # You might want to log the full command in case of errors,
    # like accidentally having two commands without spaces between them.
    ffmpeg_cmd = "/opt/bin/ffmpeg" + overwrite_opt + loglevel_opt + report_opt + input_opt \
    + codec_opts + preset_opt + crf_opt + filter_scale_opt + output_opt
    command1 = shlex.split(ffmpeg_cmd)
    try:
        # Run FFmpeg and create the resized video.
        p1 = subprocess.run(command1)
        # Open the newly created video file for reading ('r'), in binary form ('b').
        vidfile = open(temp_output_path, "rb")
        # Upload the new video file to the output destination we specified earlier.
        resp = s3_client.put_object(Body=vidfile, Bucket=s3_output_bucket, Key=s3_destination_filename)
    except subprocess.CalledProcessError as ex:
        logger.exception("CalledProcessError Exception: " + str(ex))
    except Exception as ex:
        logger.exception("Exception: " + str(ex))

    # Return the S3 key of the new file we created to the webserver
    # (or whichever entity made the Lambda request).
    return {
        'newS3Key': s3_destination_filename
    }
The main difference between this code and the AWS example code is that instead of streaming the video file, we download it into the Lambda function's ephemeral storage. I found that larger videos could not be processed properly using the streaming method, though I did not find the exact cause of why that was.
Considerations for generating 480p video previews
If your sole use of your serverless code video transcoding solution is to make upload previews (i.e. what a user sees in the submission screen, not what a site visitor sees when browsing), then you may want to adjust the ffmpeg variables to allow for faster transcoding.
Some recommendations are below:
| Variable to change | Modification | Reason / Impact |
| Video codec | x265 -> x264 | Much faster encoding (4-5x faster, if not more) |
| Codec preset | medium -> ultrafast | Quality isn't essential for a preview, further reduces encoding time |
Increasing the CRF (i.e. reducing the output quality) also reduces encoding time, but generally the faster encoding time isn't worth the quality reduction.