Transcoding larger video files
To transcode large video files that a serverless code function can't handle, you need to use a dedicated transcoding service. This page demonstrates how to do this with AWS.
Transcoding large video files on AWS
There are three main services we'll be making use of here:
- AWS Elemental MediaConvert: the service that will actually perform the video transcoding
- AWS EventBridge: the service that will notify us when a transcoding job is completed, so we can automatically update our databases or whatever else we want to do.
- AWS Lambda: to receive notifications from EventBridge, and update our database with the newly transcoded video URLs.
Technically, you don't need Lambda and EventBridge here if you wanted to run a few videos through MediaConvert manually. However, unlike say the Lambda API, you can't schedule a MediaConvert job and then wait to get a response, so we are using Lambda here to process the response.
Invoking MediaConvert via the AWS SDK
You'll need to set up the following resources before you can try to run the code below:
- An IAM role for MediaConvert to use (you can do this in the Create Job area in the MediaConvert console, follow the directions)
- An IAM user with the above role, with an access and secret key pair to use for authentication
Creating an Output Preset and Job Template
To make running jobs on MediaConvert easier, you can define templates and presets that you want to use often, and pass them as parameters when creating jobs, so you don't have to specify them every time.
Example Output Preset
This is the output preset in JSON form; you can configure an output preset in the MediaConvert console, and then export/import them as JSON files like this.
This particular preset specifies that the output file should be scaled to 1920 pixels wide, leaving the height unspecified (meaning that it will preserve the source video's aspect ratio). It specifies x265/HEVC as the encoder to use, the QVBR quality level and maximum bitrate, among other parameters.
Note that the QualityTuningLevel parameter has a major impact on the price of transcoding on MediaConvert, as does the codec you choose. MediaConvert's pricing is split into two tiers, Basic and Pro; x265/HEVC is only available on Pro which is more expensive, and multi-pass or single-pass with high quality are even more expensive, as opposed to single pass optimised for speed.
{
  "Name": "<the name you want your Output Preset to have>",
  "Settings": {
    "VideoDescription": {
      "Width": 1920,
      "CodecSettings": {
        "Codec": "H_265",
        "H265Settings": {
          "MaxBitrate": 5000000,
          "RateControlMode": "QVBR",
          "QvbrSettings": {
            "QvbrQualityLevel": 7
          },
          "CodecProfile": "MAIN_MAIN",
          "SceneChangeDetect": "TRANSITION_DETECTION",
          "QualityTuningLevel": "SINGLE_PASS_HQ",
          "BandwidthReductionFilter": {
            "Strength": "AUTO"
          }
        }
      }
    },
    "AudioDescriptions": [
      {
        "CodecSettings": {
          "Codec": "AAC",
          "AacSettings": {
            "Bitrate": 96000,
            "CodingMode": "CODING_MODE_2_0",
            "SampleRate": 48000
          }
        }
      }
    ],
    "ContainerSettings": {
      "Container": "MP4",
      "Mp4Settings": {}
    }
  }
}
Example Job Template
This is a Job Template in JSON form. You can specify an output preset to use for the template, which makes managing a job template a lot easier than having all the output details in the template itself.
The main point of the job template is to specify where the result files of the transcoding, i.e. the newly transcoded videos, should be uploaded. You can also specify how often MediaConvert should update the status of the job, though this isn't relevant most of the time.
Note the the AccelerationSettings parameter only works on the Pro tier, and is only used when a job requires a sufficiently large amount of processing power. If you're using the Pro tier, you can set this to preferred and it'll automatically use acceleration when eligible (it doesn't cost any extra). This reduces the time required to complete a given transcoding job.
{
  "Name": "<the name you want your Job Template to have>",
  "Settings": {
    "TimecodeConfig": {
      "Source": "ZEROBASED"
    },
    "OutputGroups": [
      {
        "Name": "File Group",
        "Outputs": [
          {
            "Preset": "<the name of your Output Preset>"
          }
        ],
        "OutputGroupSettings": {
          "Type": "FILE_GROUP_SETTINGS",
          "FileGroupSettings": {
            "Destination": "s3://<your S3 bucket name>/<some path>/",
            "DestinationSettings": {
              "S3Settings": {
                "StorageClass": "<the S3 storage class to use, e.g. INTELLIGENT_TIERING>"
              }
            }
          }
        }
      }
    ],
    "Inputs": [
      {
        "AudioSelectors": {
          "Audio Selector 1": {
            "DefaultSelection": "DEFAULT"
          }
        },
        "VideoSelector": {},
        "TimecodeSource": "ZEROBASED"
      }
    ]
  },
  "AccelerationSettings": {
    "Mode": "PREFERRED"
  },
  "StatusUpdateInterval": "SECONDS_60",
  "Priority": 0,
  "HopDestinations": []
}
Example code to transcode a video using the Job Template
Here's an example of how to start a transcoding job, in Node.js:js, using the Job Template and Output Preset you created earlier.
import { CreateJobCommand, MediaConvertClient } from "@aws-sdk/client-mediaconvert";

let mediaConvertClient = new MediaConvertClient({
    region: "<the AWS region you want to use>",
    /*
      The endpoint is a unique URL for your account, per region. You can
      find it in the MediaConvert "account" tab.
    */
    endpoint: "<your MediaConvert endpoint for the region>",
    credentials: {
        accessKeyId: "<your user's IAM access key>",
        secretAccessKey: "<your user's IAM secret key>",
    },
});

let params = {
    JobTemplate: "<the name of the JobTemplate> to use",
    Role: "arn:aws:iam::<your AWS account number>:role/service-role/<your IAM role for using MediaConvert>",
    Settings: {
        Inputs: [
          {
            FileInput: "<the S3 URL to the video you want to transcode>",
          },
        ],
    },
};

let command = new CreateJobCommand(params);
let response = await mediaConvertClient.send(command);
The response here is just an acknowledgment of whether the job command was started or not, as opposed to returning the actual result of the job (as for longer jobs, it could take a pretty long time). An error will be returned if the job command didn't work, because of invalid credentials or parameters, but not if the job starts and fails for some other reason.
Getting the result of the job
Since creating the job command doesn't tell us anything about the result of the job, we need to use AWS EventBridge to notify us about the job results, and we need an AWS Lambda function to receive the notification and do something with it. First we'll create the Lambda function, then create the EventBridge rule.
Create a Lambda function to receive your EventBridge notifications
In the Lambda console, go to Functions and create one. You can use whatever runtime you like; for example purposes I'm using Node.js 20.x here. You can use your existing Lambda execution role for this function if you have one, or create a new one using the form.
For the function itself, here's a very basic bit of code we can enter, just to verify that the EventBridge notifications are being received successfully:
export const handler = async (event) => {
  // TODO implement
  console.log("Received event from EventBridge: %o", event);
  const response = {
    statusCode: 200,
    body: JSON.stringify('Hello from Lambda!'),
  };
  return response;
};
With our Lambda function ready, we can create our EventBridge rule.
Create an EventBridge rule to monitor MediaConvert jobs
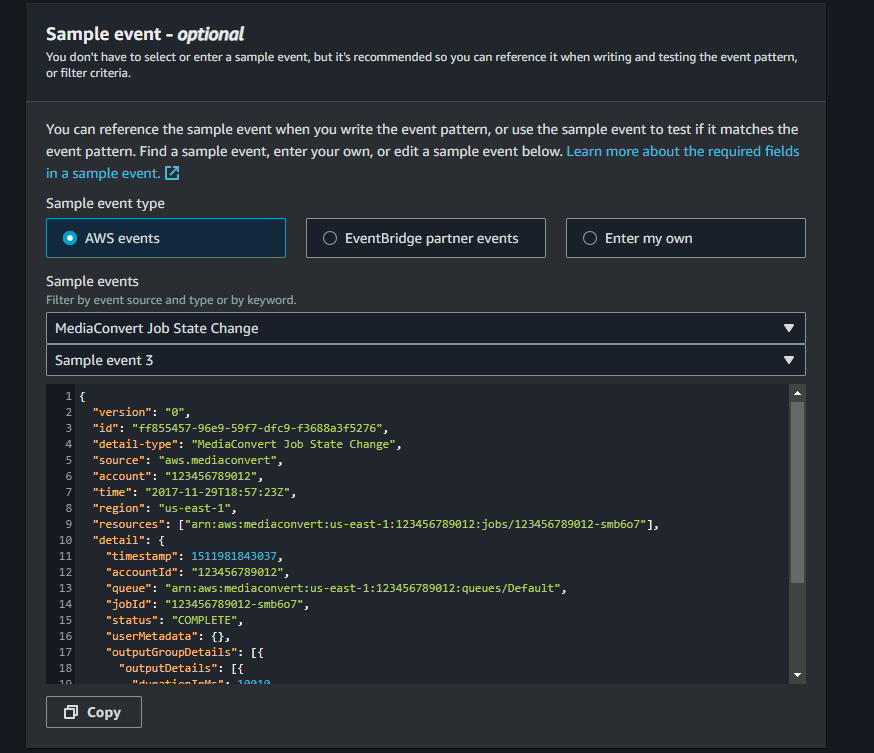
In the EventBridge console, go to Rules and create one. Select Rule with an event pattern and enter a name for the rule. The Event Source should be AWS events or EventBridge partner events; it's worth selecting one of the sample events just to have it there for reference later. Search for "MediaConvert Job State Change" to find it.
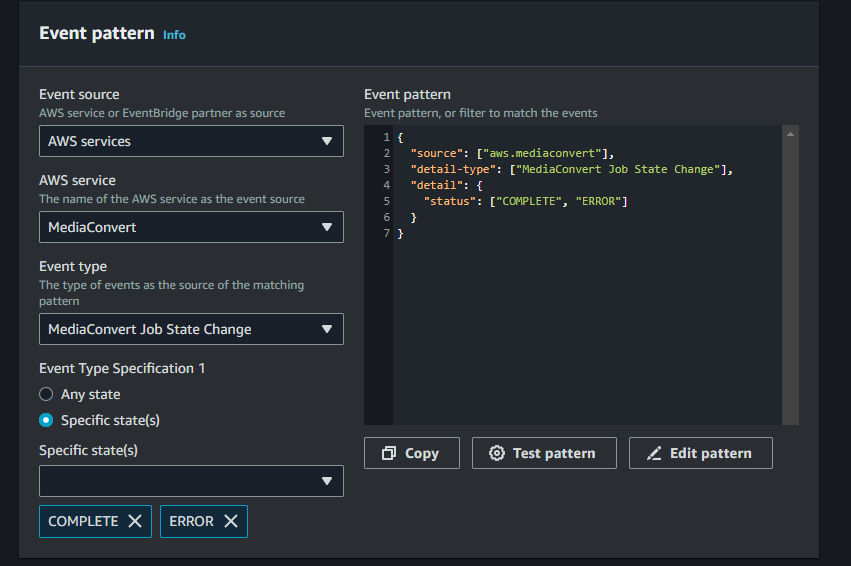
For the Creation Method, select Use pattern from, and for the Event Pattern, select AWS Services -> MediaConvert -> MediaConvert Job State Change, then add the state changes you want to listen for (here, COMPLETE and ERROR state changes have been added).
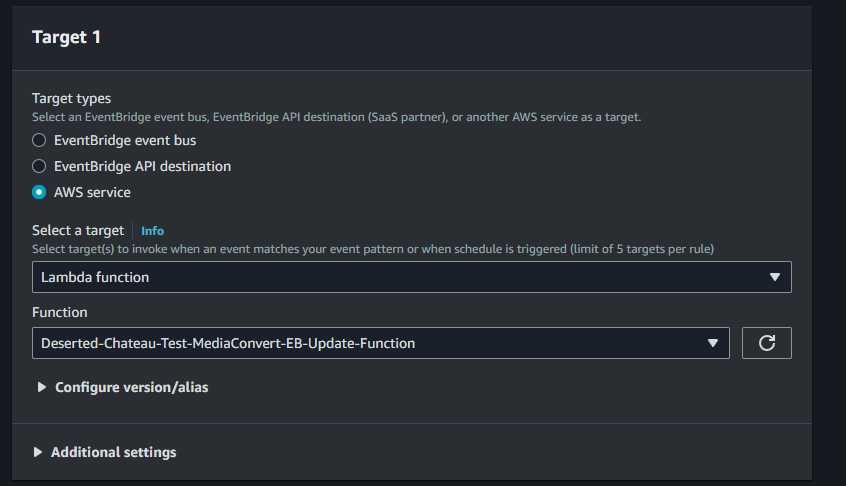
Now we need to specify the target these event notifications should be sent to. Select AWS Service as the target type, then Lambda function. You should be able to find the Lambda function you created earlier in the list (if you can't, it may be that you created your Lambda function in the wrong region; your EventBridge rule and Lambda function need to be in the same region).
That's everything; click next until the rule is created.
Testing the integration
To test that your setup is working, run your Node.js code (not the Lambda function, the code to create a MediaConvert job command), or create a job manually in the MediaConvert console. Once the job completes, or returns an error, you can check your Lambda function's logs in CloudWatch to see if it received the EventBridge notification successfully.
If your Lambda function is getting the notifications, you can now change your Lambda function code to do whatever you want with the notification. For instance, you could update your database with the URL to the newly transcoded video file, or set a flag for that video's record in your database signifying a transcoding error.